How to Build Facebook Custom Audiences for Business – 2021 Guide
Custom audiences are a type of audience in Facebook that almost every business uses at some point. Every single client we work with uses custom audiences in their sales funnels as part of their targeting strategy. That’s because this type of Facebook targeting is very powerful – especially when used as part of an overall strategy on Facebook.
I’m going to show you step by step how to set up and use custom audiences in Facebook, but first let me tell you what custom audiences are.
What Is a Custom Audience?
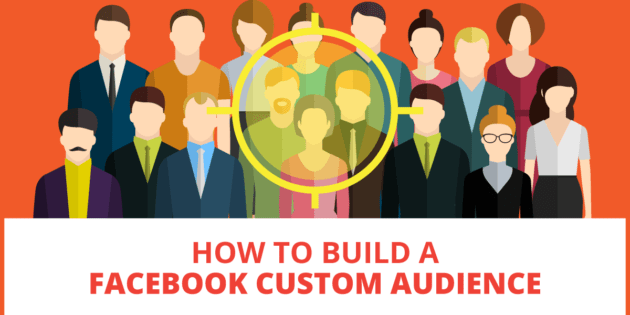
The easy definition is that Facebook custom audiences are audiences that you create from data that you already own in your business.
Much of the time in Facebook you’ll be using audiences like:
- Interests
- Demographics
- Behavioral targeting
This is also known as cold targeting or cold audiences.
When you use a custom audience, instead of using the data that Facebook provides for targeting, you will be using your own data – data that is UNIQUE to your business. This normally comes from lists of people who are familiar with your business.
You can build a custom audience in Facebook from:
- A customer list
- An email list
- People who have visited your website or specific page on your website
- People who have interacted with you on Facebook
- People who have bought your products or services
- People who have watched your videos
There are a few more as well, and I’ll go into more examples as I get into the steps of building these types of audiences.
This is also known as warm targeting or warm audiences.
PRO TIP: Facebook custom audiences will usually perform very well and will almost always outperform “cold audiences.” That’s because people in custom audiences are already familiar with your business.
If you already have a reasonably large buyers, email, or website visitors list, then I recommend that you start your Facebook advertising journey specifically by advertising to the people in these audiences. It’s likely to give you your best ROI.
Setting Up Facebook Custom Audiences
In order to set up Facebook custom audiences you’ll need to go into your ads manager at business.facebook.com. If you don’t have one and don’t know how to set this up, you can check out this video here.
To get started click on the three lines in the left hand corner and select audiences. For me, it’s already in my frequently used area.
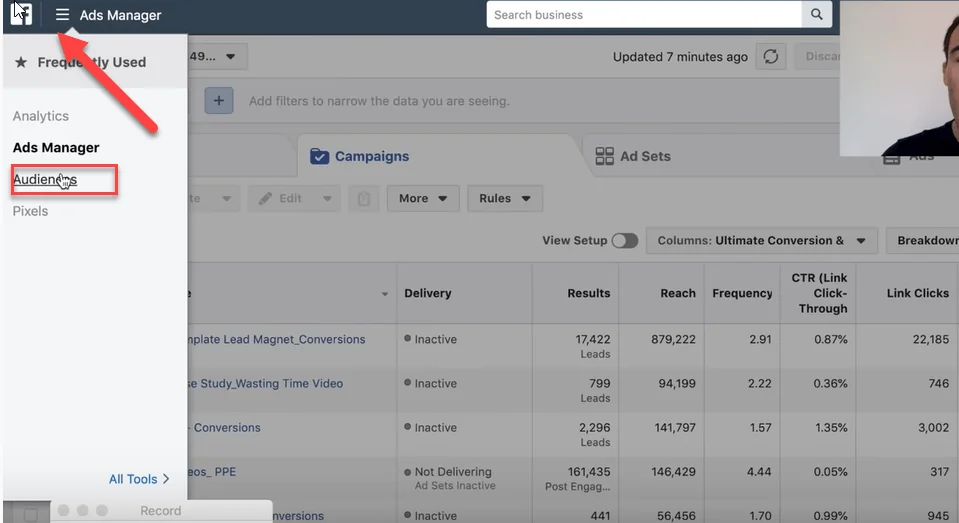
If you are just starting out, it will be under the column called assets.
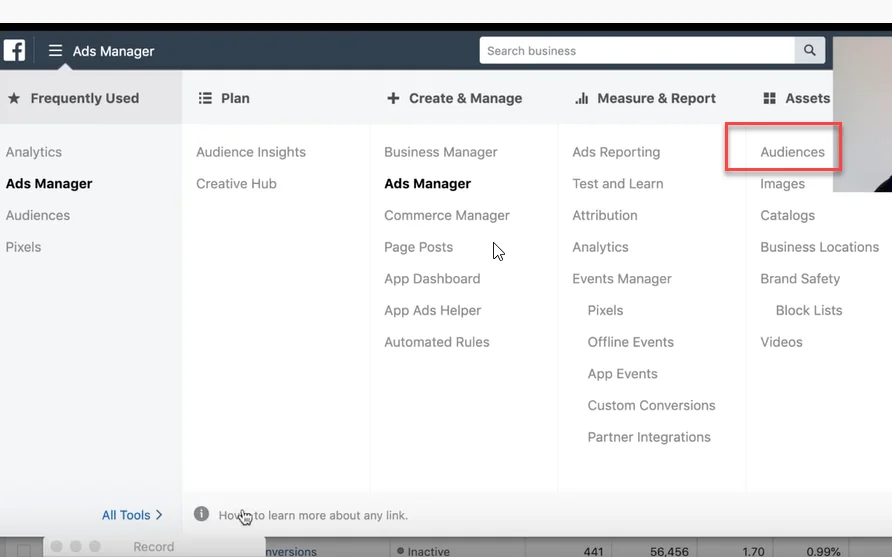
Remember if you haven’t done this before, it’s going to be pretty empty. That’s perfectly fine. You’ll be filling it up soon with custom audiences that you’ve created.
Click on the button “create audience” and you’ll have three different types: custom, lookalike, and saved.
You want to click on custom audience.
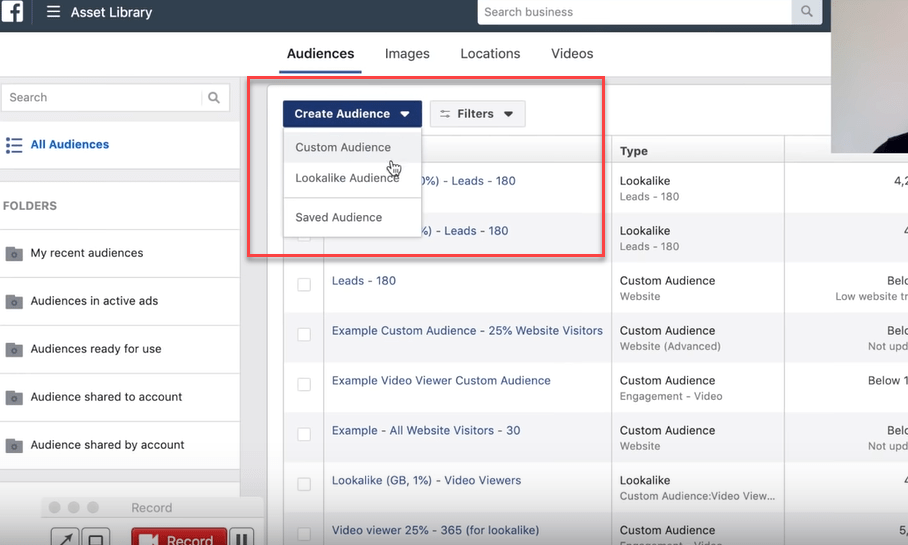
In this tutorial, in addition to going over custom audiences I’ll briefly be touching on lookalike audiences at the end of the article. Lookalike audiences are extremely powerful and you create them from your custom audiences. So stick around for that!
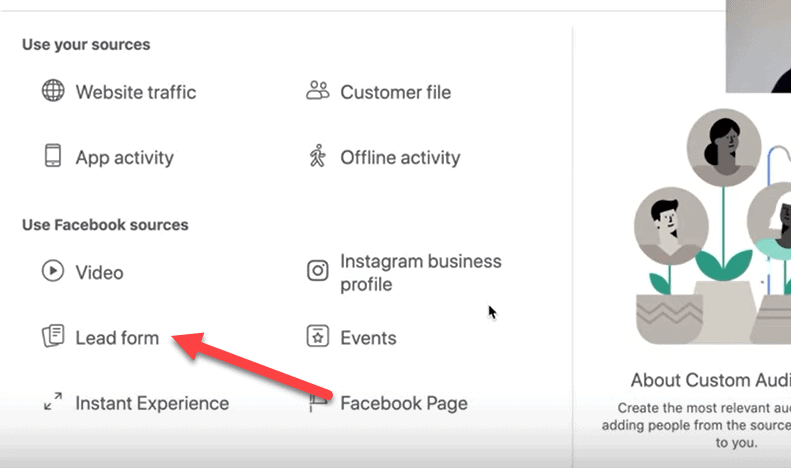
Once you click on custom audience, you are going to get a number of options.
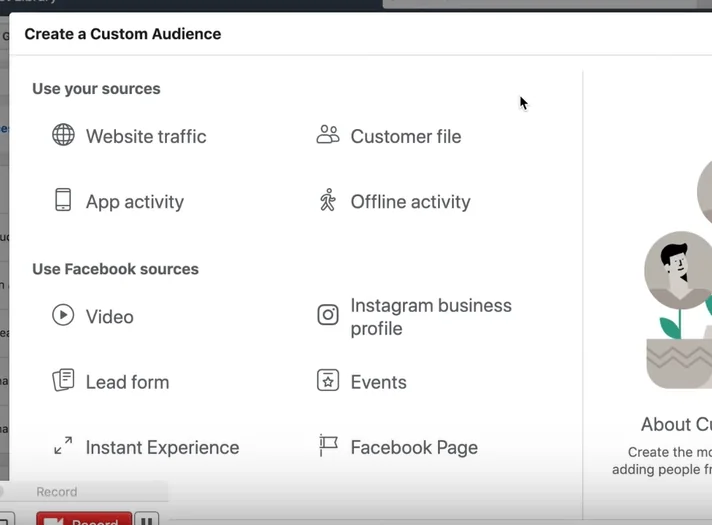
This can seem overwhelming, but don’t worry. I’m going to go through all of the important options on this list and rank them for you in order of most useful to least useful in terms of likelihood of conversions.
Generally speaking custom audiences made from the following sources will be most valuable in this order:
- Customer lists
- Email lists
- Website traffic
- Facebook activity
About Lifetime Customer Value: Facebook has a feature where you can upload how much customers are worth over a lifetime of purchases. This is called lifetime customer value or LTV. If you have this data it’s great, because Facebook will serve your more valuable customers first. Most people don’t have this data, and that’s OK – custom audiences are powerful even without it.
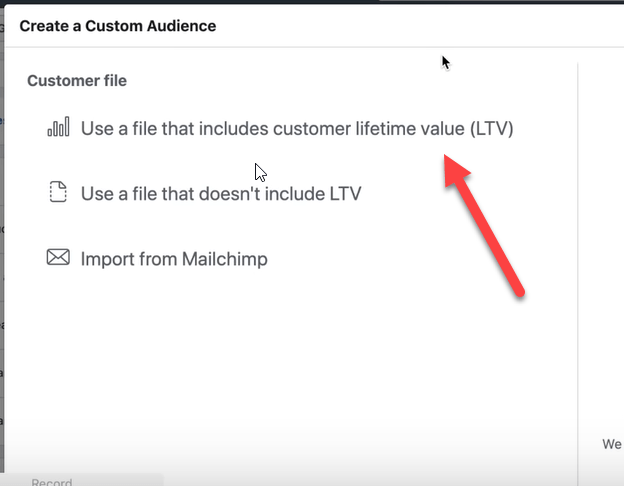
Uploading Customer/Prospect Data to Create Custom Audiences
When you are creating a custom audience, most of the time you will have to upload a file of data yourself.
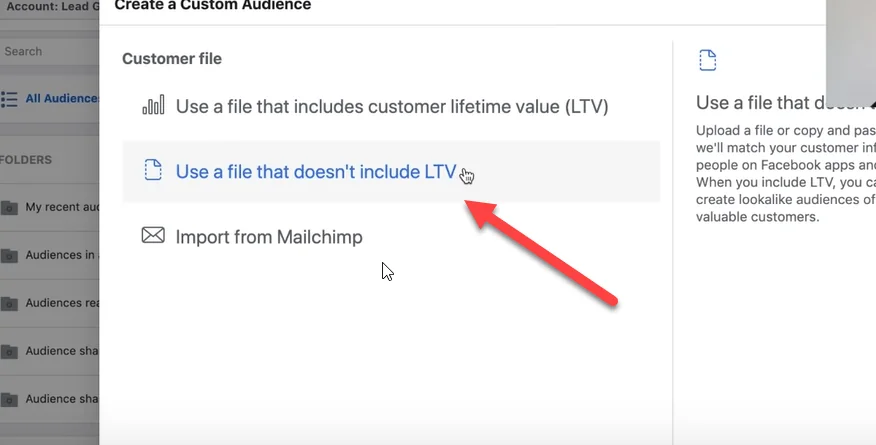
There is an option to import data from Mailchimp as well, but most people in small businesses aren’t using Mailchimp.
If you have the data in an Excel spreadsheet convert it to a CSV file and upload it that way.
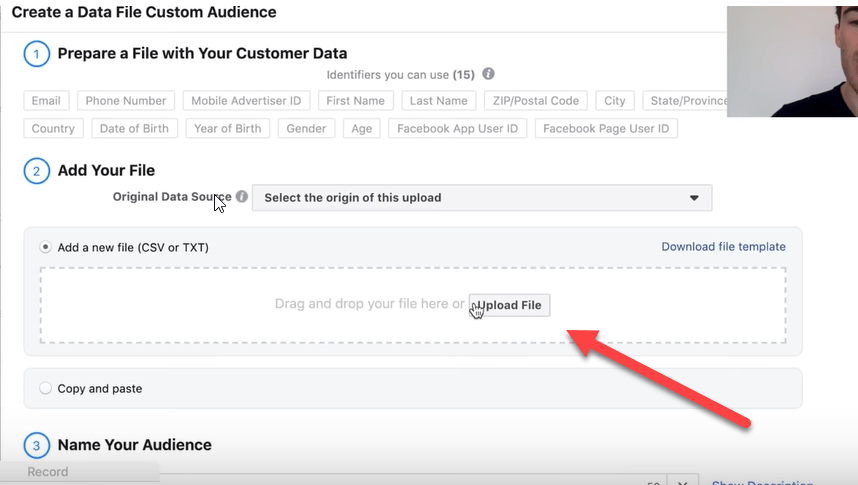
You will want to include as much data as possible to give Facebook. You can see the data they will match to your file under “prepare a file with your customer data.”
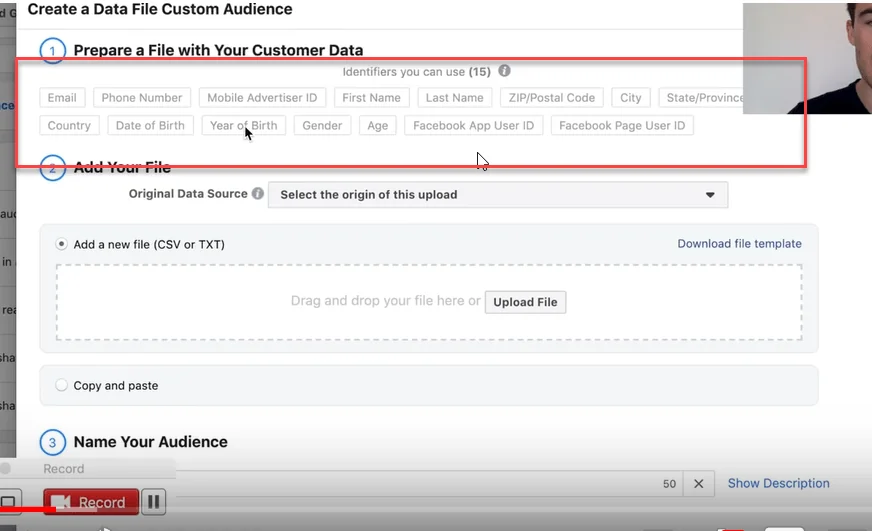
Pro Tip: The more data you include in this file, the better. Facebook uses the email address as it’s primary source. But if your prospects email address doesn’t match, Facebook will attempt to match with other data that you provide.
With this method, most people can expect a 50% match rate on Facebook.
If you have trouble with this step, Facebook has a great tutorial here.
After you are done uploading the data, give your audience a name and then click “create audience.”
At this point your audience will start populating with matches and show up in the home screen in your audiences section.
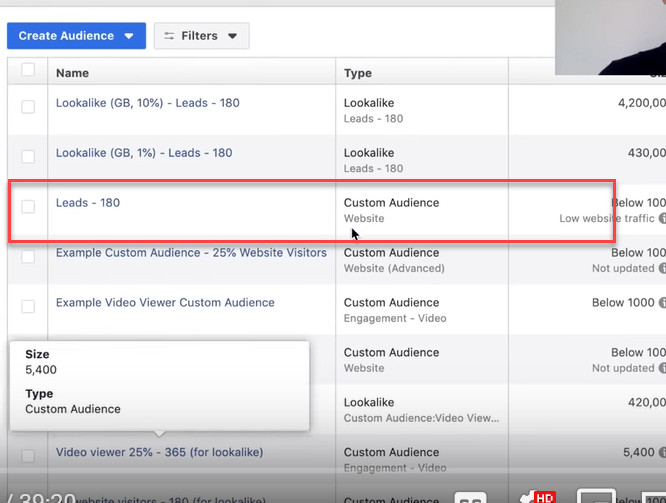
You can use two main types of lists to create a Facebook custom audience with a customer/prospect data upload.
- Customer list.
This will create your most powerful audience – if it’s big enough (at least 500 people). That’s because people who have already spent money with you are likely to do so again if you target them with a similar offer. - Email list.
Not as responsive as a customer audience, but still likely to be far more responsive than a cold audience. If you don’t have a customer list yet, this is a good place to start.
Pro Tip: Always start with a customer list if you have one. It is most likely to get you the best results.
This type of uploaded audience will need to be updated as you gather more contacts. It’s a good idea to create a recurring task for yourself where you upload the contacts once the audience grows more than 10%.
Using Website Traffic to Create a Custom Audience
In addition to data that you upload, Facebook can track the website traffic you get to your entire site or to specific pages. They do this through the use of a piece of code called a pixel. You can see how to install the Facebook pixel here.
Once you have the Facebook pixel installed and it’s collecting data you can set up website traffic audiences. To do that, click on the website traffic option under create a custom audience.
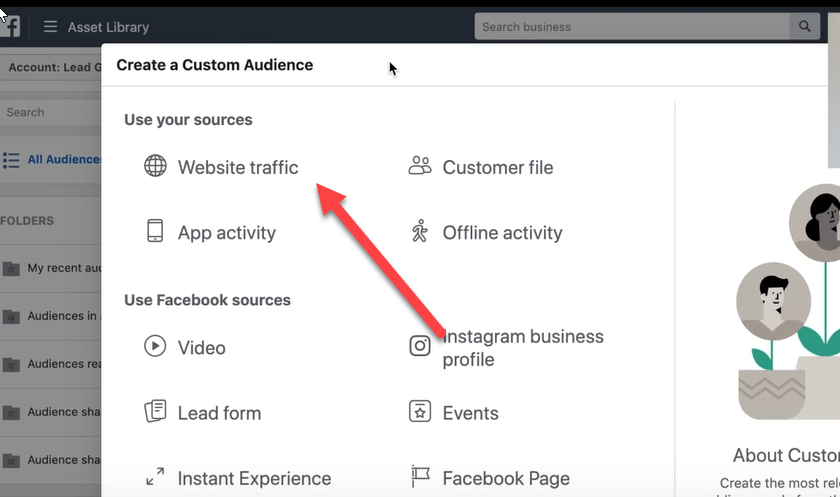
Targeting All Website Visitors
There are a lot of options here, but the one that is used most commonly is “all website visitors,” which is the preset.
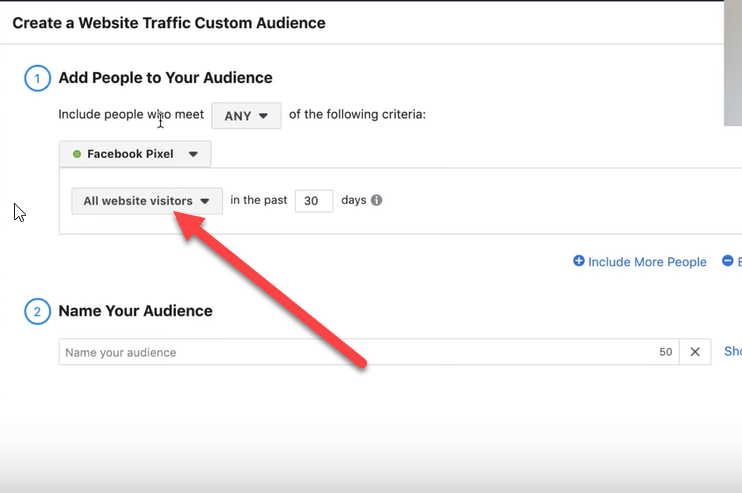
Next you need to choose a time frame. This is all the people who visited your website within the last so many days.
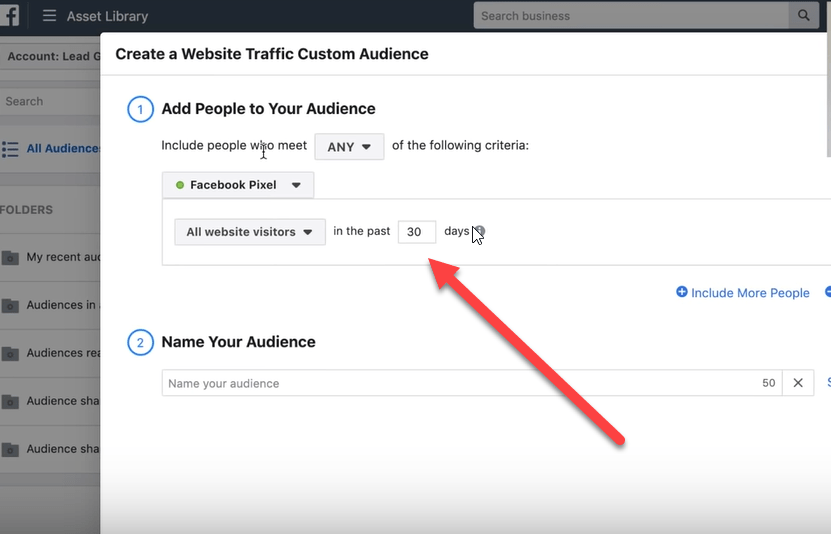
You can choose as little as 1 day or as far away as 180 days. For most people, I recommend choosing a 30 day window. You can always create new audiences in different time frames and test which one works better.
You want your audience to be big enough not to get ad fatigue and be tired of seeing your ads, but not so far out from a visit to your website that they are no longer warm prospects. It’s a balance.
While the all website visitors section is the one we use the most often with our clients, there are also a few other options as well.
Targeting Website Visitors by Page
One of the choices for targeting is people who have visited specific web pages.
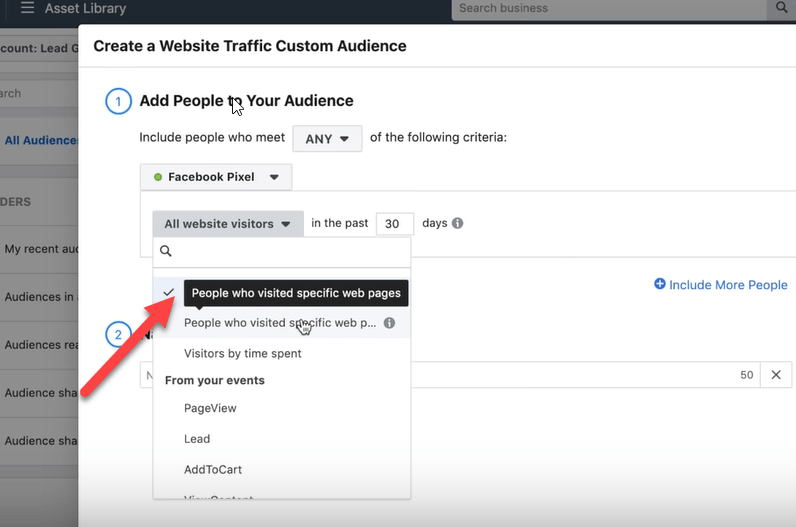
For example, in my business we often retarget people who visit the services page at https://heathmedia.co.uk/services/ . People who visit this page are usually specifically interested in finding an agency to help them with their Facebook advertising.
To retarget people who visit this page we select “people who visited specific web pages” and put the URL in the URL box. Just make sure you select URL equals.
This type of targeting works very well for people who visit a thank you page after a purchase. Often, if people purchase once, they will purchase again and you can build a buyers audience with this technique.
Notice a theme here? Buyers lists of any type are fantastic!

You can also target a group of pages that have the same category, but using the “contains” drop down option.
For example, if I wanted to show a specific ad to everyone who visited a Facebook advertising blog on my website and each URL contained advertising, then I could put advertising in the box above and show ads only to those people.
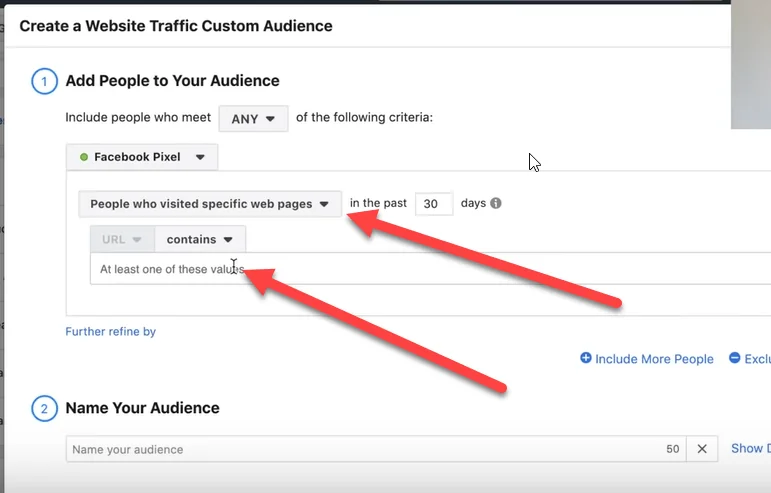
The advantage to this type of targeting is that it is VERY specific. But sometimes the audiences can be too small, especially if you don’t get a lot of website visitors.
The good news is that Facebook will tell you if the audience is too small. You’ll see a box like this if that happens.
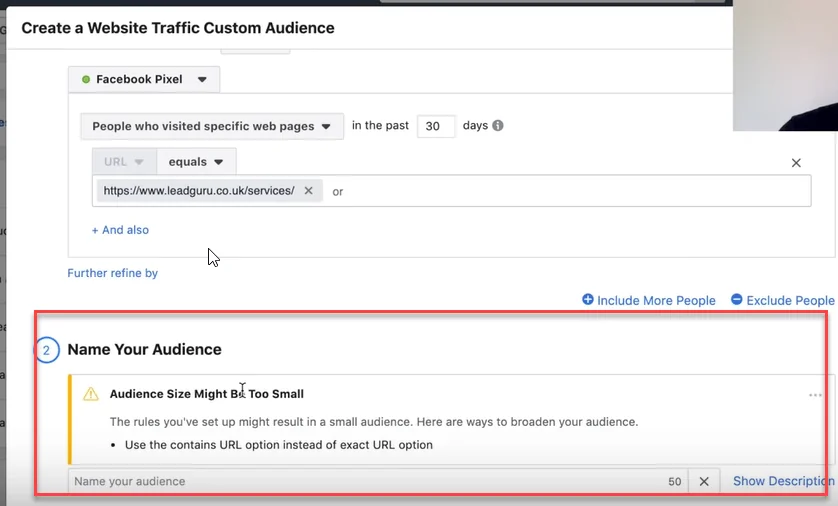
If your audience is too small, then you can target more web pages using the contains feature or your entire site. You can also target people over a longer time frame to make your audience bigger.
Another feature that you can leverage is Facebook’s exclude feature.
Let’s say I wanted to advertise to people who have visited our services page, but haven’t contacted us. I could exclude people who have visited our contact page.
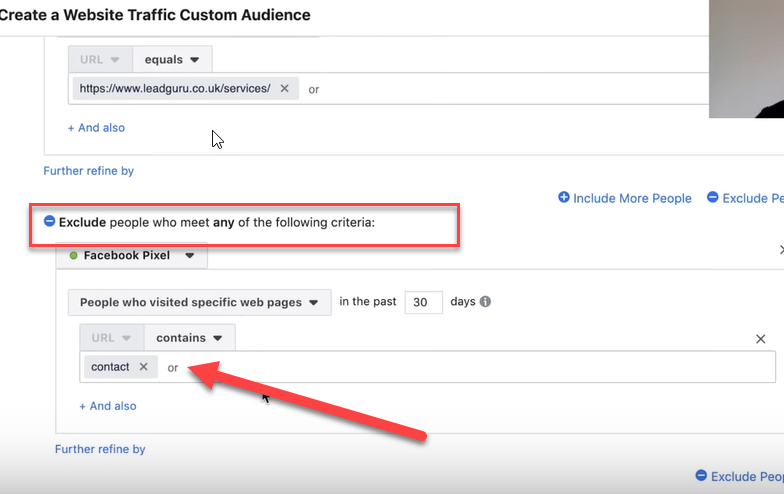
You can get extremely specific in the way this works, and I find that it’s a good idea to map it out on a piece of paper or an online document before setting it up. That way you know exactly who you want to set up your audiences for.
Targeting Website Visitors by Time Spent on Your Website
Another option that Facebook has is to target visitors by the amount of time they spend on your website.
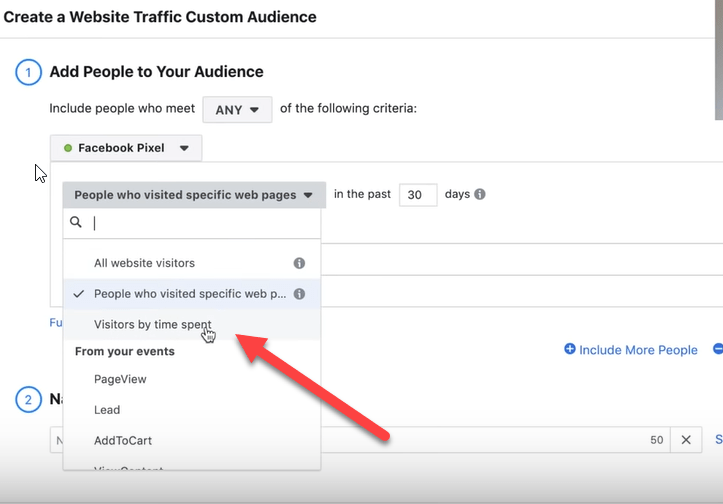
The options here are the top 5, 10, and 25% of people who spend the most time on your website.
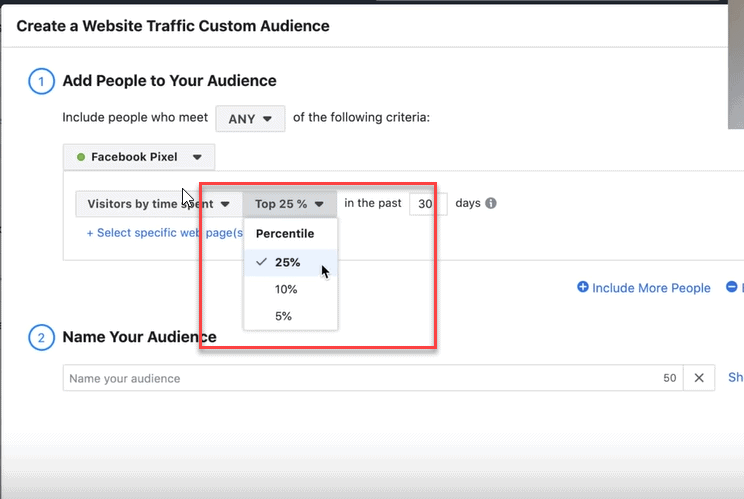
Like most other things with Facebook ads, there is a trade off. If you go with the top 5% your audience will be smaller, but because they have spent more time on your site they may be more likely to buy.
Pro Tip: Making decisions about audience size vs. how warm your prospects are needs to be done on a case by case basis. If you are generating 10,000+ visitors a month to your site, you may be able to narrow your audience more. If you don’t get as much traffic you will need to keep your setting broader. The default will always be all website visitors.
When you are done selecting your options hit “create audience” and your audience will start populating from the data your pixel collects.
Targeting Website Visitors by Events
The last option in using website traffic to create custom audiences is to target website visitors by events.
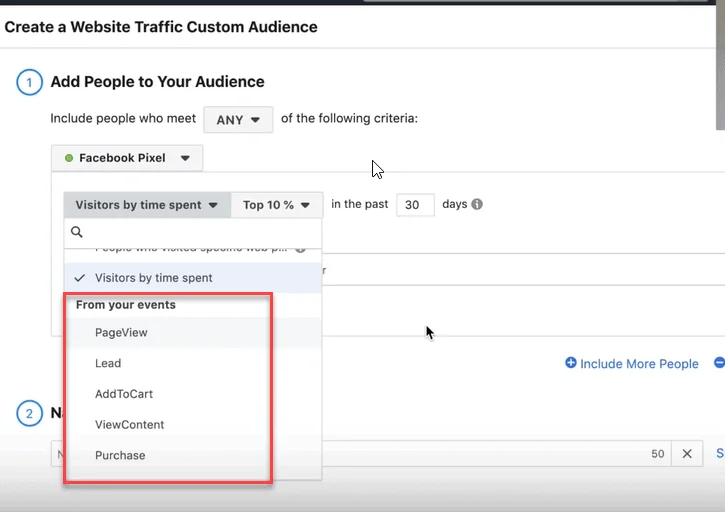
To use this option you have to have event codes set up on your website. You do this with a bit of additional code added to your standard Facebook pixel. You can read how to do that here.
With this option, you can create custom audiences based on the actions that people take like adding to cart, filling out a lead form, or making a purchase.
One of my favorite set ups for a custom audience for ecommerce stores is to advertise to people who have added to cart and exclude people who have purchased. This is generally a very hot audience to target.
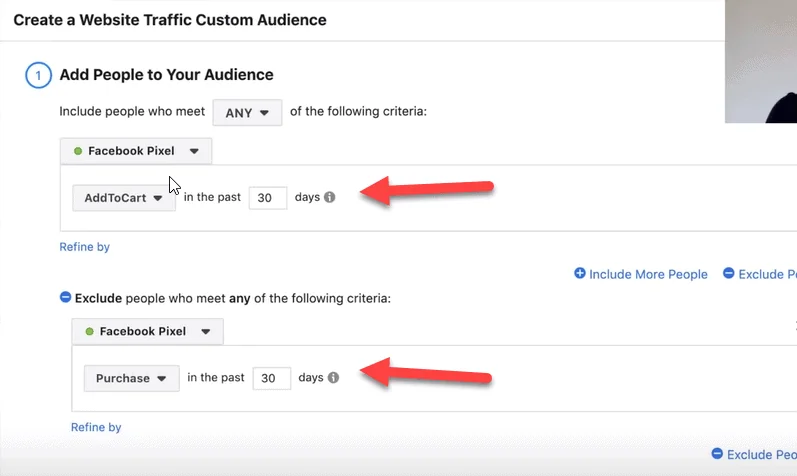
The big thing to keep in mind when creating any of these audiences is to figure out exactly who you want to advertise to. You can create as many combinations of custom audiences as you want and get quite granular with it. It really is only limited by your imagination.
If you do have an eCommerce store, you can also use the pixel to advertise to previous purchasers with new offers. In that particular case, website traffic can work as well as an uploaded customer list.
One of the things I like about website audiences is that they stay pretty fresh and automatically update with new website visitors as time goes on. You can create near evergreen campaigns with website visitor custom audiences on Facebook.
Pro Tip: The big thing to remember is that it’s usually better to create a larger, broader custom audience and get used to working with it. Then you can go more narrow and granular as you develop specific advertising campaigns for specific people who come to your website.
Using Facebook Events to Create Custom Audiences
So far I’ve gone over the different ways you can use off Facebook custom audiences. Now I’m going to show you how to build custom audiences using Facebook interactions.
Generally speaking, these custom audiences won’t be as warm and likely to convert as lists you upload and website traffic, but they can still be useful.
Here is the order I would use them in:
- Video
- Lead form
- Facebook Page
Targeting Video Viewers
The most popular option right now for targeting Facebook events is to build an audience of people who have watched a video or part of a video that you’ve put up on Facebook.
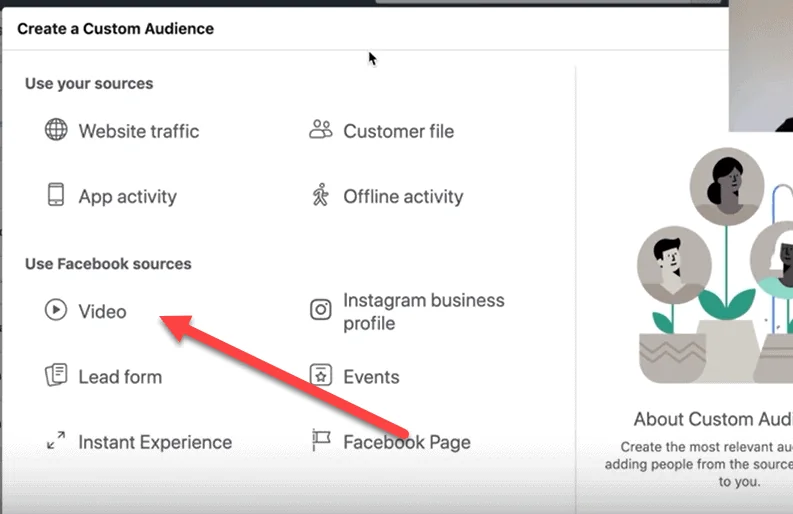
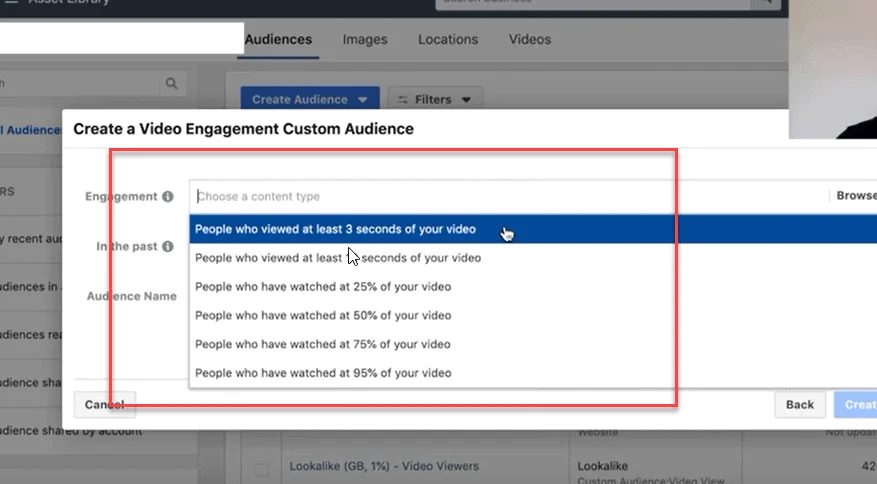
When selecting a video views audience, you can tell Facebook how much of the video you would like people to have watched.
Usually, I go with 25%.
The rule here is the same as other custom audiences. You can either make your audiences bigger (3 second views) or more exact and smaller (95% views). Generally speaking the sweet spot is somewhere in between.
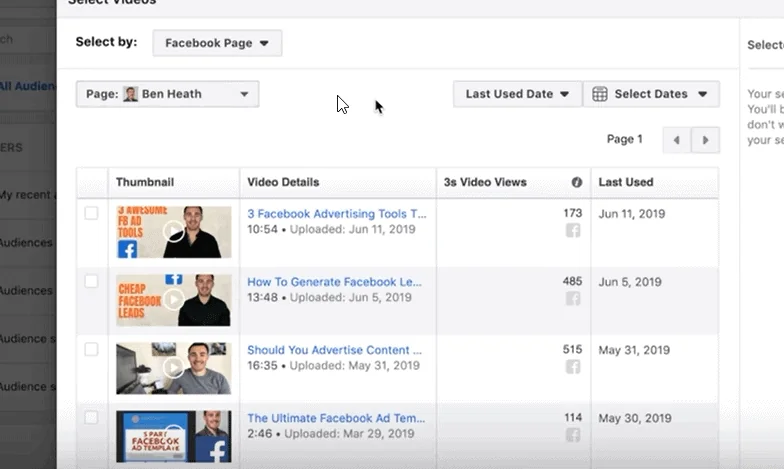
The next thing you need to do is choose the videos that you want to use.

This can be a selection of related videos or a single video. It depends on how many people watch your videos as well as what type of advertising you want to put in front of this custom audience. You want to use videos that had a lot of views and are relevant to your offer, so that you can build a decent size custom audience.
Next, you select how many days into the past you want the video views to have occurred. You can go as long as 365 days.
What I recommend to most people is to start with 365 days unless they have millions and millions of video views. If you have a large amount of video views you can go with 180 or 90 days instead.
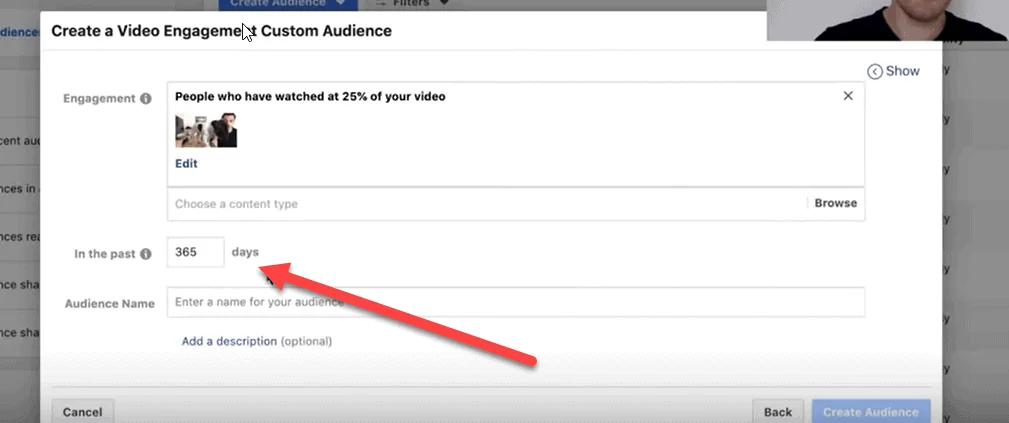
The final step is to give your audience and name and click “create audience.”
Targeting People Who Fill Out a Lead Form
If you use Facebook’s native lead forms, you can target people who submit a form to your business. If you aren’t familiar with lead forms already, I have a great post here on how to run lead campaigns in Facebook.
There are several options to choose from when targeting people who interacted with your lead form. You can target people who opened the form, who opened but didn’t submit, or who opened and submitted the form.
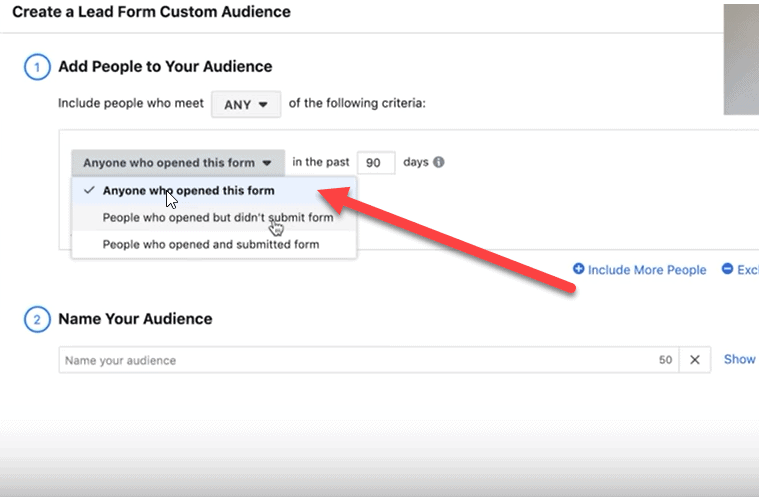
As always, the audience that you choose depends on how broad or targeted you want your custom audience to be.
Generally, most people go with people who opened but didn’t submit the form. That way you can target people who have interest and try to get them to submit the form.
Next you select the time frame that tells Facebook how recently someone interacted with your form. I usually select 90 days here, which is the default.
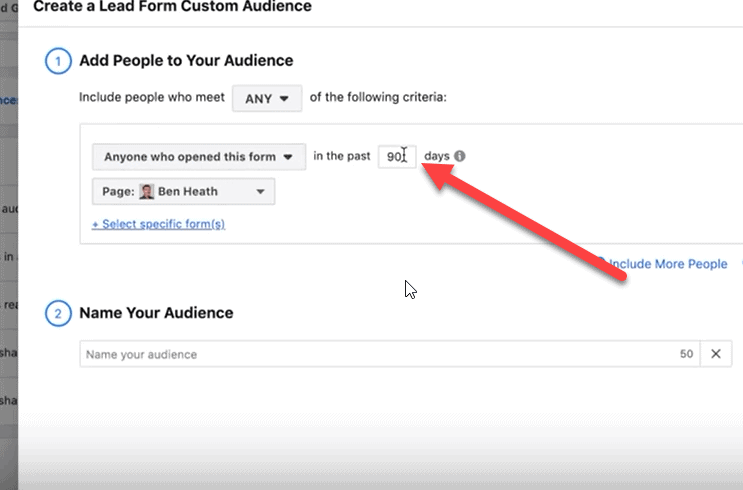
You can also select specific forms to create audiences from.

For instance, if you have a form that people have filled out to get a free ads template for Facebook, then you may want to follow up with an ad for a consult on how to use those templates in their business.
This can be very specific and very powerful.
Finally, you want to give your audience a name and click create audience.
Targeting People Who Interact With Your Facebook Page
Another option is to target people who have interacted with your Facebook page.
Generally this audience is far less warm than the other audiences I’ve gone over so far. But they are still warmer than a cold audience who is completely unfamiliar with your business. But I still don’t find that this audience typically performs well and so I don’t use it a lot.
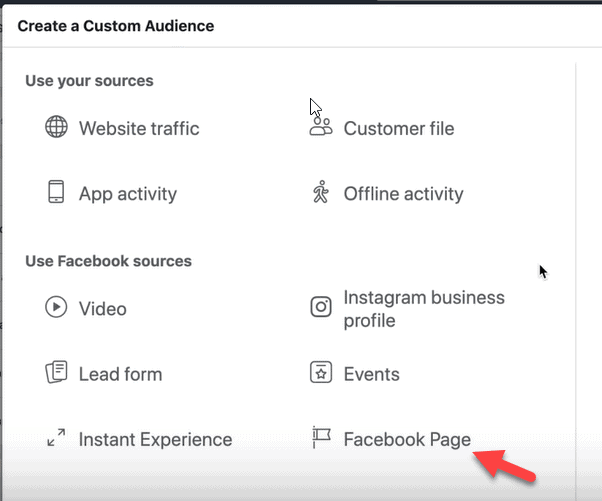
There are also several options to choose from in how you create this audience.
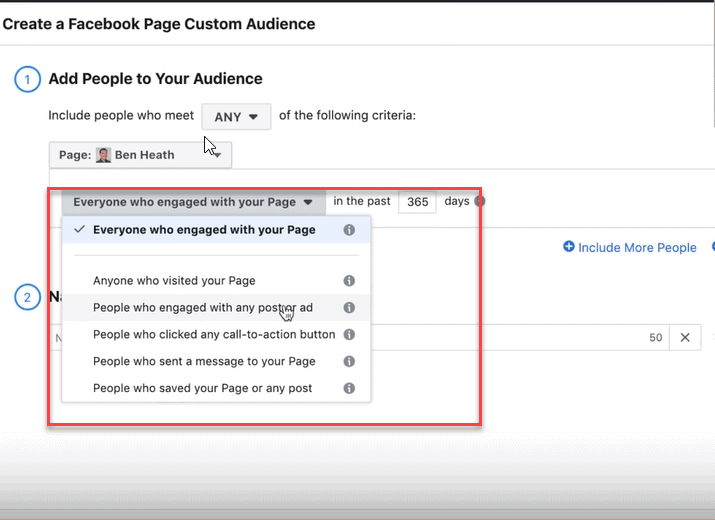
The largest option is usually people who engaged with any post or ad. This is the one I usually recommend to people because the other ones aren’t as targeted or are much smaller.
Once you’ve made your selection then name your audience and press create audience.
Get More In Depth Training: I’m hosting a webinar soon with step-by-step training on 3 Facebook advertising strategies that I’ve personally used to generate 7+ figures for our clients. You can register here.
Expanding Your Custom Audiences with Lookalike Audiences
Custom audiences can be powerful, but unless you are spending millions of dollars on Facebook ads, they also tend to be pretty small.
That’s why once you find a custom audience that converts well for you, then you should ALWAYS make lookalike audiences from your custom audience.
I have a in depth tutorial on lookalike audiences that you can check out. But right now, I’ll go over the basic philosophy.
If you have a custom audience that you built from a customer file and it is converting into sales for you, then you can tell Facebook to go out and find the 1% closest matches to those people’s profiles.
That’s what a lookalike audience is, and they often perform very close to or just as well as the custom audience you make them from.
To make a lookalike audience you go into your audiences section and select the custom audience from the one you created earlier.
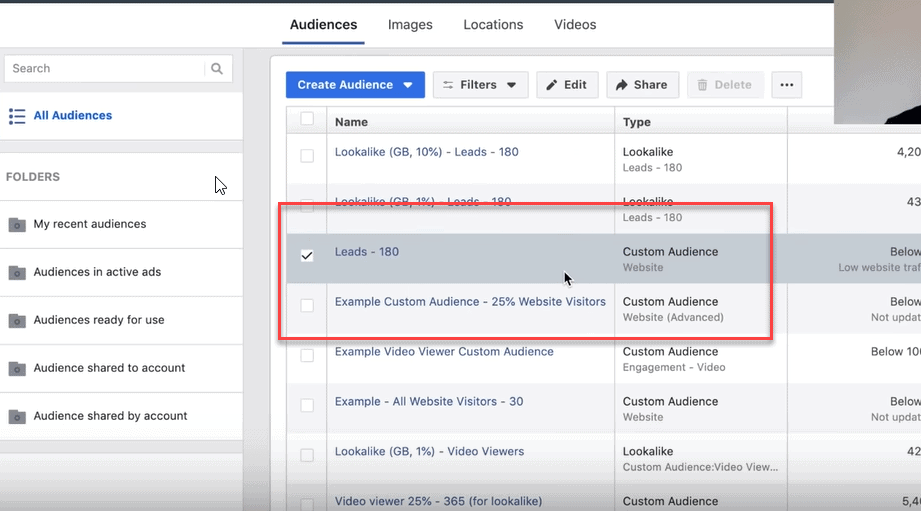
Then you select the three dots at the top and select “create lookalike.”

Then you want to select your countries and audience size – 1% is going to be the closest to your custom audience and is a good place to start.

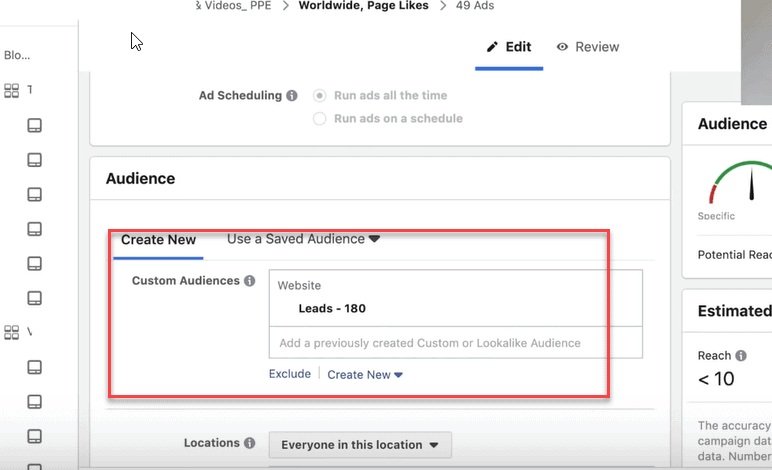
Once Facebook creates your custom audiences and lookalike audiences you can select them in your ad manager at the ad set level.
Facebook Custom Audiences Video Tutorial
This 40 minute video goes over each step of setting up Facebook Custom Audiences.
The Bottom Line on Using Facebook Custom Audiences for Business
Facebook custom audiences allow you to use existing business data to give yourself a head start with your ads. Start with your buyer’s audiences and then work your way down the list.
Once you have your custom audiences set up, you can increase their power and reach by creating lookalike audiences from that data.


