
How to Retarget Website Visitors on Facebook
Looking to retarget website visitors on Facebook?
Well, this article shows you exactly how to do just that.
Before we get into the steps, let’s start by clarifying a few things.
Retargeting, or remarketing, is a form of online advertising where marketers advertise to people that have already interacted with their business.
There are many different groups of people that you can retarget: customer lists, email lists, Facebook page engagers, video viewers, etc. And there are a number of different platforms that you can retarget people on: Facebook, YouTube, Google, etc.
But retargeting website visitors on Facebook is one of my favourites.
Nearly every single Facebook advertising sales funnel that I create will feature a website visitor retargeting campaign.
And all advanced Facebook advertisers use them.
The reason why is simple: They are highly effective.
If someone in your target market has taken the time to visit your website, they have clearly demonstrated interest in your products, services or content.
Because of that, advertising to these people is usually a slam dunk. And generates a much better return on investment.
With that said, let’s go through the steps.
1) Install the Facebook Pixel on Your Website
If you want to advertise to people that have already visited your website on Facebook; Facebook needs to be able to identify those people.
Facebook does this with the Facebook Pixel.
Installing the Facebook Pixel sounds difficult and technical, which puts a lot of people off, but it doesn’t have to be.
And the upside of installing it, is well worth the hassle.
If you have a WordPress website, the Facebook Pixel is very easy to install. I have created a short video that shows you how to do it in a couple of minutes:
For those that prefer text and image instructions, the same steps are included below.
Start by going into Ads Manager and navigating to the Pixels Tab:
![]()
Then click the Set Up button, found in the upper right of your screen. And that will bring up a window that looks like this:
![]()
If you use one of the platforms listed in the 1st option in the screenshot above – you’re in luck.
Facebook make it very easy for you to install the Facebook Pixel.
You just need to select learn about platform integrations and follow the instructions for your specific platform.
Otherwise you will need to install the Facebook Pixel yourself or hire a develop to install it for you.
I’m going to show you how to install the Facebook Pixel on a WordPress website. If you don’t have a WordPress website and you’re not technically inclined, I would recommend hiring a developer to install it for you.
You can find a developer to install it for you on UpWork and it won’t cost a lot at all.
To install the Facebook Pixel on a WordPress website yourself, you need to find your Facebook Pixel ID.
Select the 3rd option from the screenshot above and you’ll see something that looks like this:
![]()
Copy your Pixel ID and then login to your WordPress website and go into plugins.
The easiest way to install the Facebook Pixel on your WordPress website is with a plugin.
The one I use is called Pixel Cat:
![]()
Install that plugin and then Activate it.
That will bring up a page that looks like this:
![]()
All you need to do, is paste your Pixel ID into the text field, click Save and that’s it.
The Facebook Pixel is now installed on your website and it’s time to move onto to the next step.
2) Create a Website Visitor Custom Audience
You’ll only be able to retarget people on Facebook that visit your website once the Facebook Pixel has already been installed.
So if you’ve just installed the Facebook Pixel, you’ll need to wait a while before you can start retargeting website visitors.
However, you can still create a website custom audience now. Facebook will add people to it as more people visit your website.
In fact, once you’ve set up your website custom audience, you won’t need to manually do anything to it ever again.
As more people visit your website, they will automatically be added to your custom audience.
To create your website visitor custom audience, head back into Ads Manager and navigate to the Audiences Tab.

Then select Create Audience and Custom Audience:
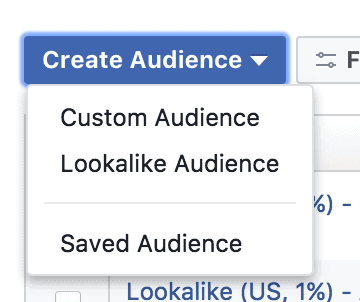
Once you’ve done that, you should see a window that looks like this:
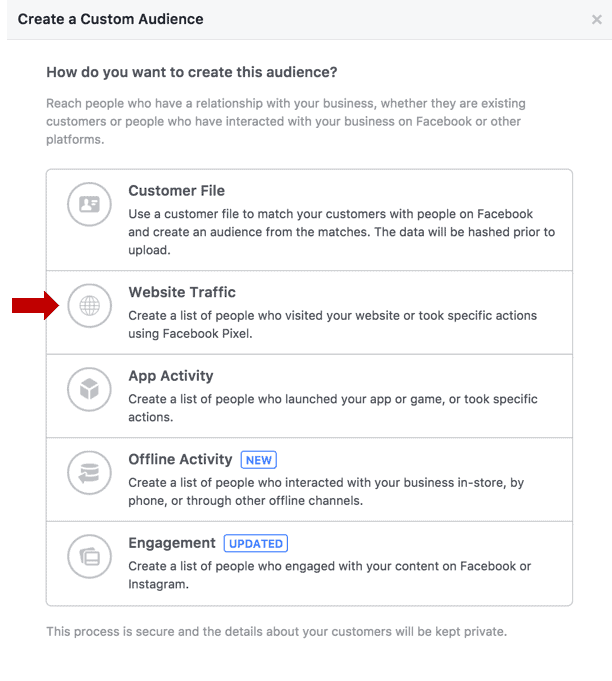
Click on Website Traffic, which you can see highlighted above, and you’ll be taken to this page:
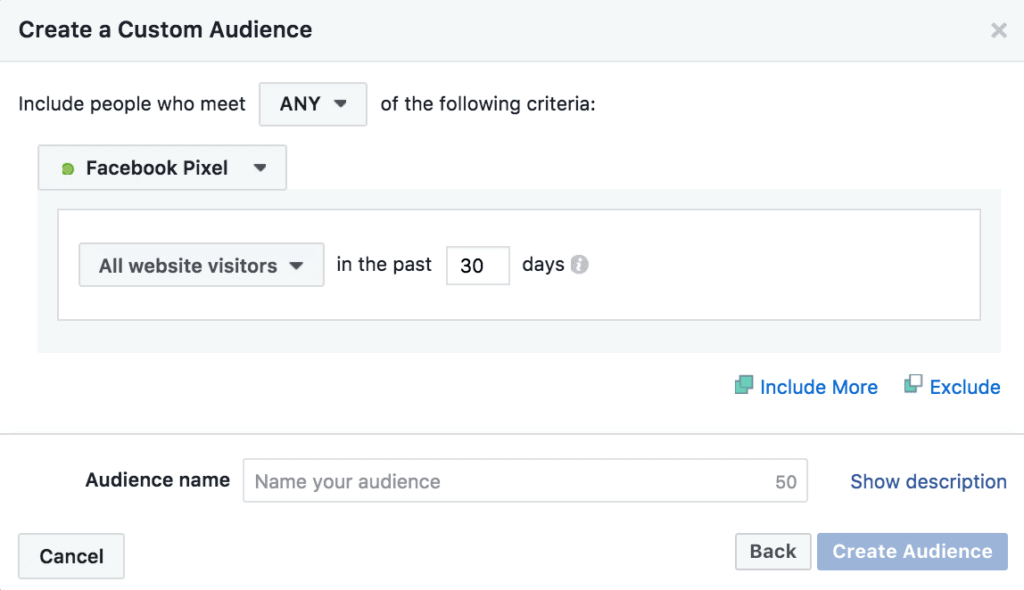
If you click on the small arrow next to All website visitors you’ll see that there are a number of options:
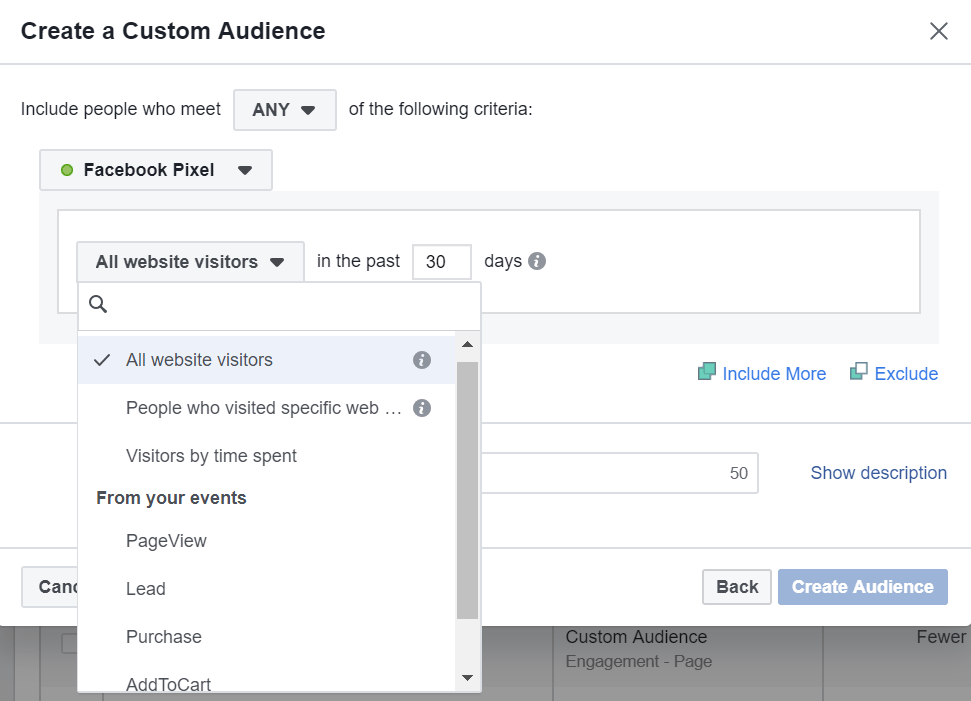
The options you can see above give you a lot of flexibility when it comes to retargeting your website visitors.
Let’s go through them…
All Website Visitors
This option is self-explanatory.
If you want to advertise to everyone that has visited your website within a certain time window then go ahead and select this option.
The other options are a bit more complicated and this is where most people start.
If you don’t generate a large amount of website traffic then this might be your best option. All website visitors is always going to generate the largest website visitor custom audience.
But once you’ve got your feet wet, I’d encourage you to get more specific and have a play with the other options.
People Who Visited Specific Web Pages
You can create custom audiences from people that have visited specific pages on your website.
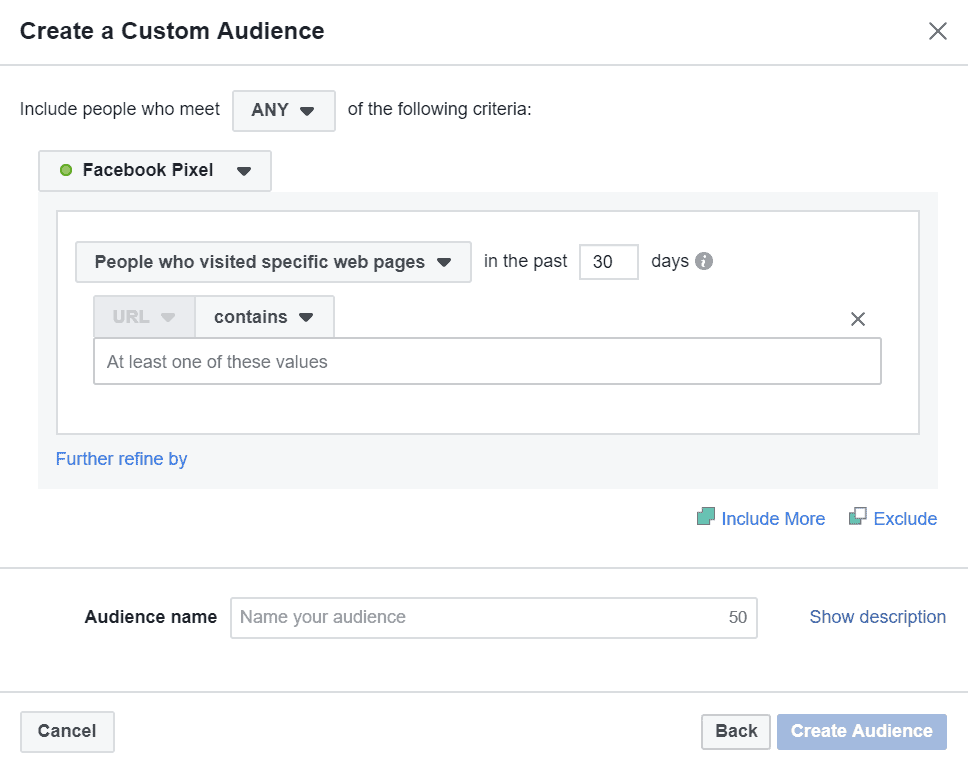
Creating this type of website visitor custom audience allows you to be very specific with who you advertise to.
For example, you can advertise a specific product or service to someone that has visited a page on your website about that specific product or service.
This is awesome! And incredibly effective.
Before you enter anything in the textfield, the first thing you need to do, is set the rules for your custom audience.
Click contains and you’ll see the following options:
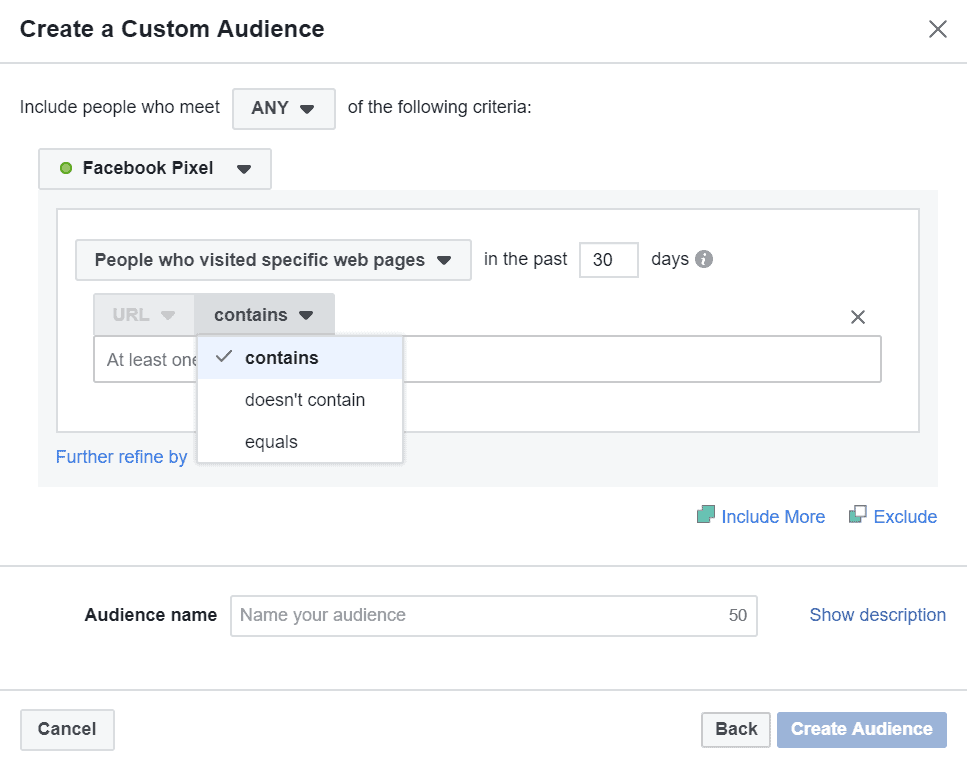
The way this works is fairly straightforward.
If you select URL contains then pages from your website that have a URL that contains that word, will be included.
For example, if I wanted to create a custom audience that included everyone that visited a page on my website that has Facebook in the URL, it would look like this:
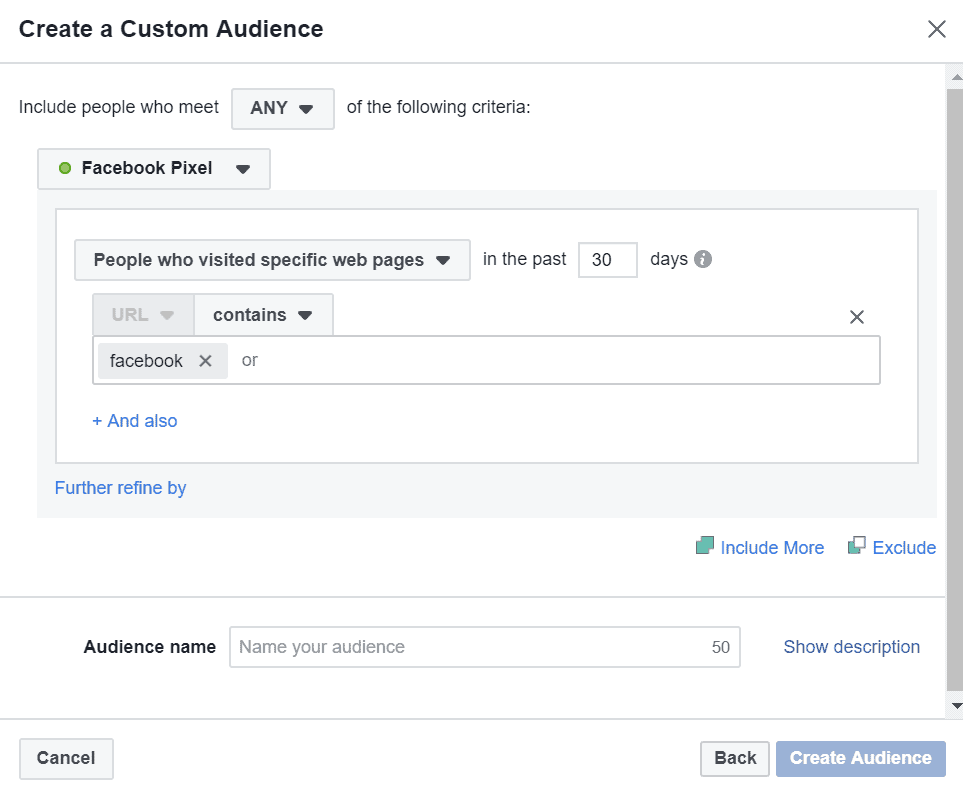
However, if I wanted to advertise only to people that have visited a specific page on my website, I would change URL contains to URL equals.
And then simply enter the page’s URL:
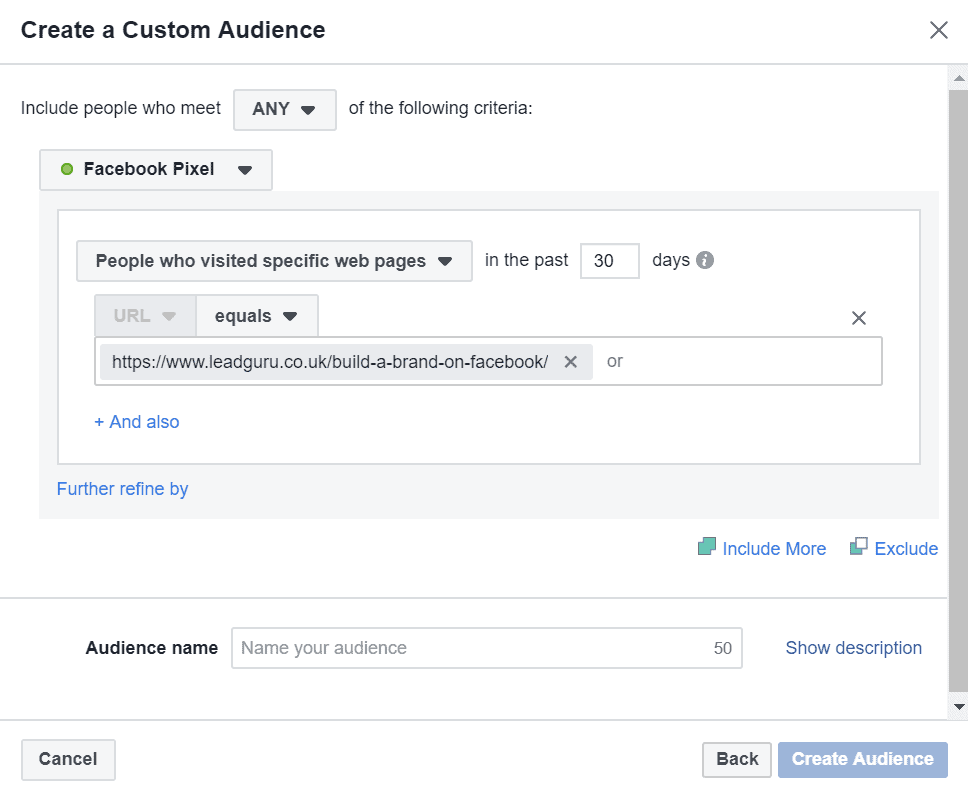
Of course if you want to include visitors of multiple pages in one custom audience, you can add more page URLs.
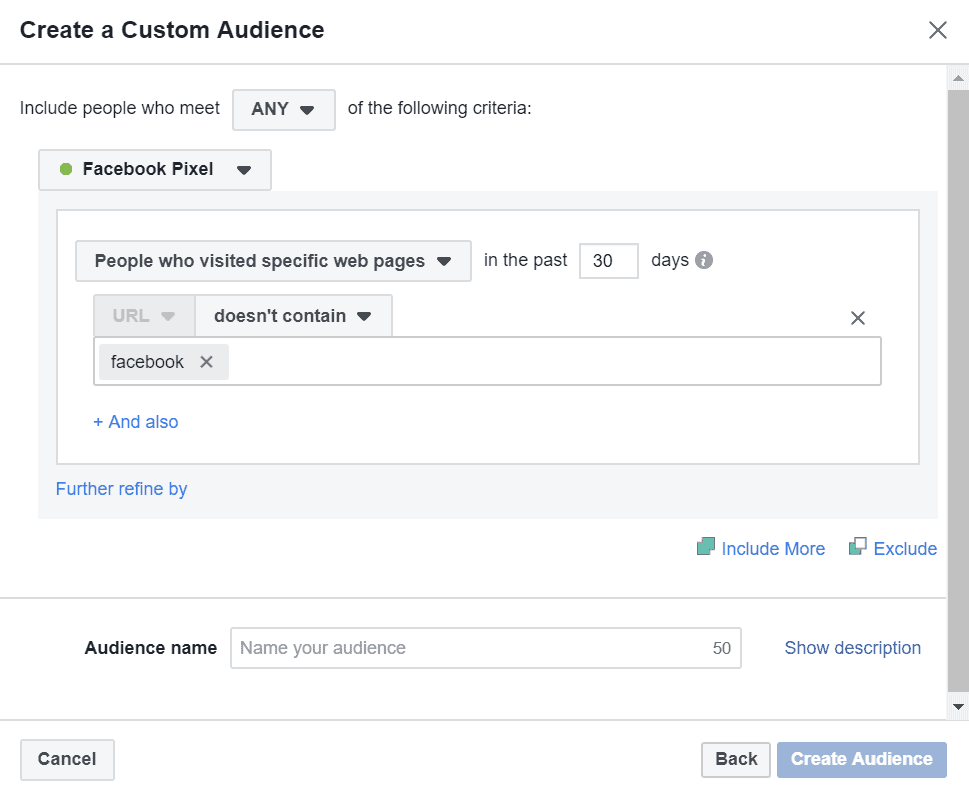
The third option is URL doesn’t contain. This is fairly self-explanatory.
Select this option to create a custom audience from people that have visited your website but not visited pages that have a URL that contains a certain word.
For example, if I wanted to retarget people that have visited my site but not visited any page that has Facebook in the URL, it would look like this:
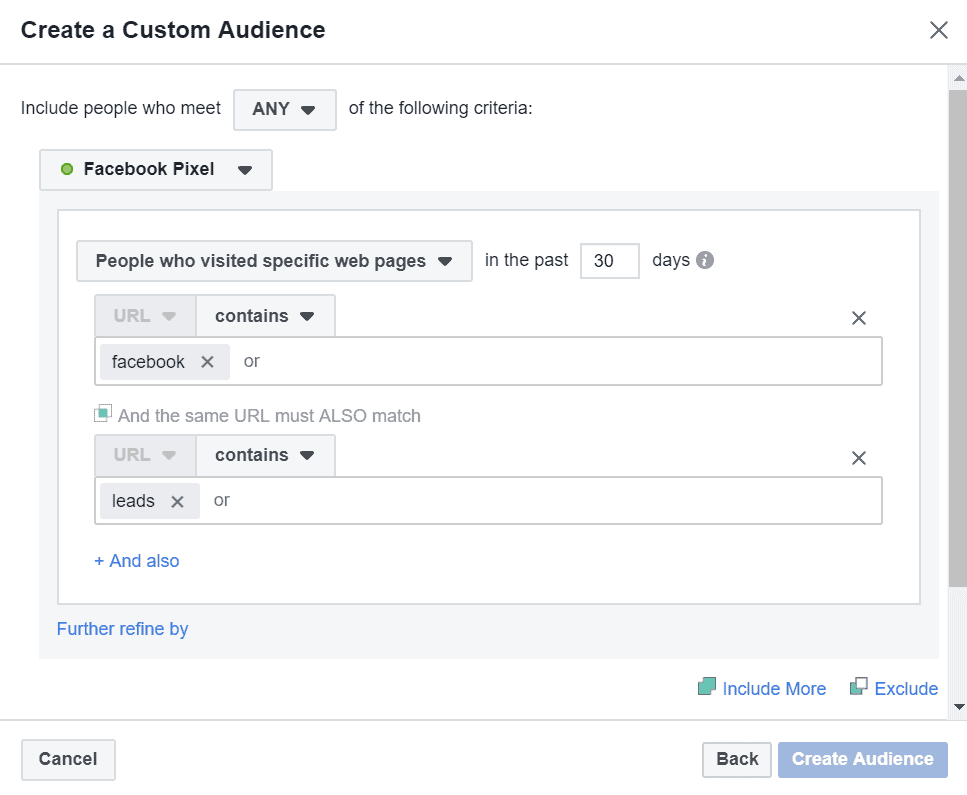
You may have noticed that in all the screenshots, there is a small + And also button.
This acts like any other and function and you can use it to create combinations that really narrow down your custom audience.
For example, I could want the qualifying URLs to contain a word such as “Facebook” and another word such as “leads”:
It’s also possible to create website visitor custom audiences from people that have visited specific pages but not others.
Select the Exclude button to enable this option and then enter the URL of the page(s) that you would like to exclude:
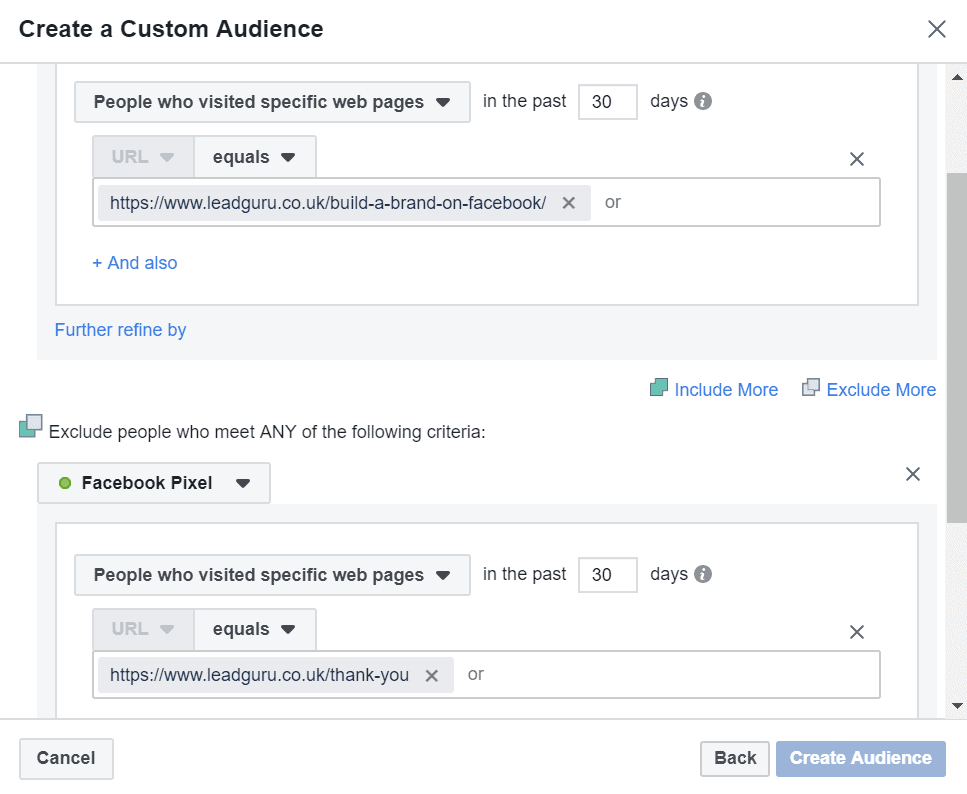
There’s no point advertising a product or service to people that have already bought it.
With this feature, you can create a custom audience of people that have visited a sales page, but have not visited that product’s order confirmation page. In other words, they have had a look, but not yet made a purchase.
Visitors By Time Spent
It’s also possible to advertise to people that have spent a certain amount of time on your website.
From the menu select Visitors by time spent to see this:
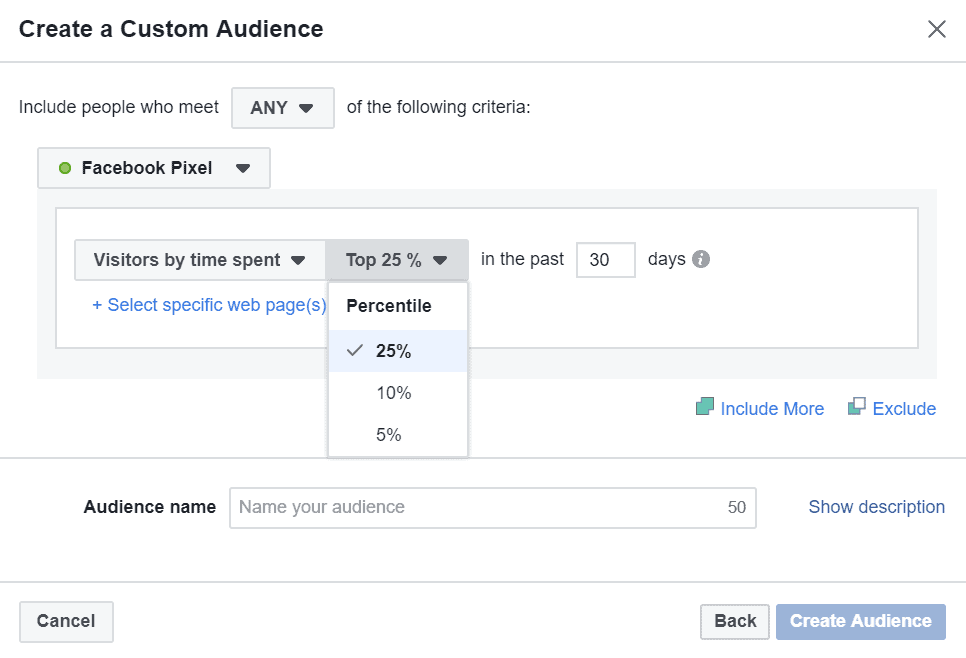
If you generate a lot of website visitors, it might be best to start by advertising to people that spend more time on your site.
People that spend more time on your website are hotter prospects and advertising to them will almost certainly generate better results.
Facebook currently lets you create website visitor custom audiences from the top 25, 10 and 5 percentiles of time spent on site.
You can also create this type of custom audience for specific pages on your website:
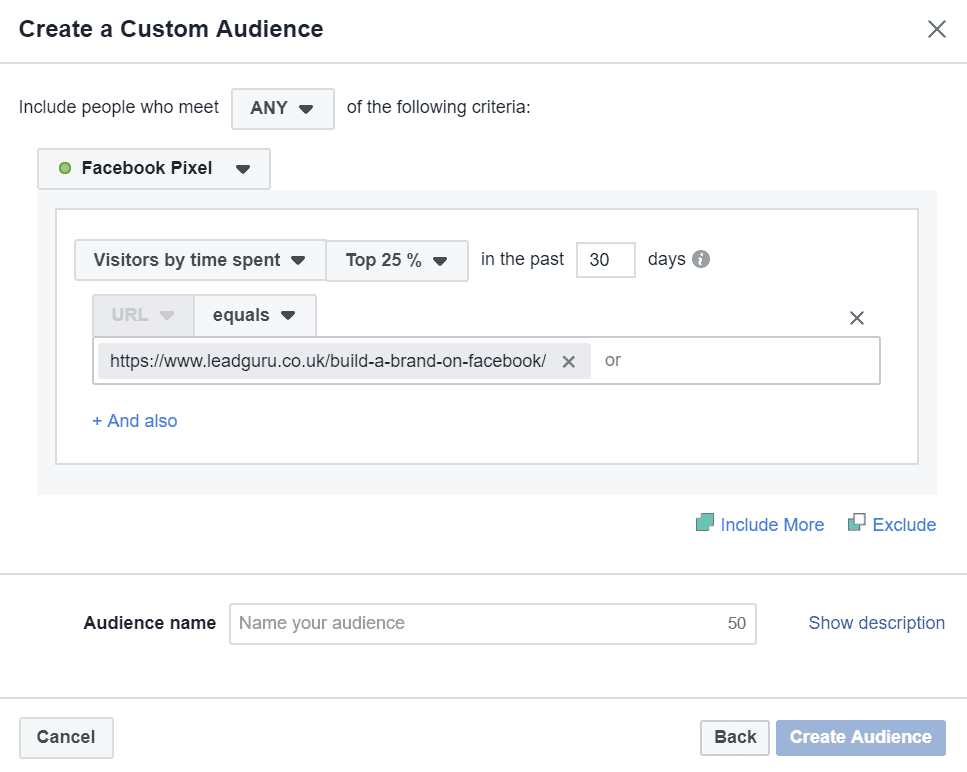
Just like with “People who visited specific web pages” there is an + And also button that you can use when you select specific web pages and an Exclude button.
They function in the exact same way.
Event Based Custom Audiences
In addition to the three options already covered, you can create website visitor custom audiences from people that have triggered certain events on your website.
Once you have the Facebook Pixel installed on your website, you can install event code on certain pages so that certain actions are tracked within your Facebook ad account.
This is really useful because it allows you to easily determine how much its costing you on Facebook to generate leads and sales.
But it also allows you to create custom audiences from people that have taken specific actions.
For example, you can create a custom audience from everyone that has made a purchase on your website or become a lead:
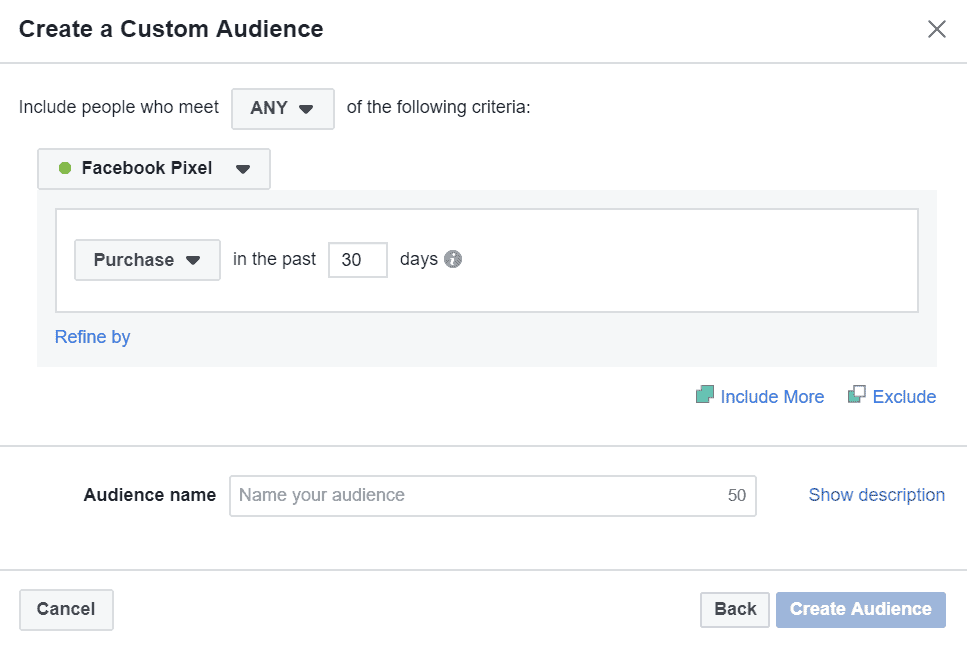
This has a number of fantastic applications.
If you have recently launched a new product, your previous purchasers are probably a great audience to start targeting.
You can also narrow this type of custom audience down using the Exclude button.
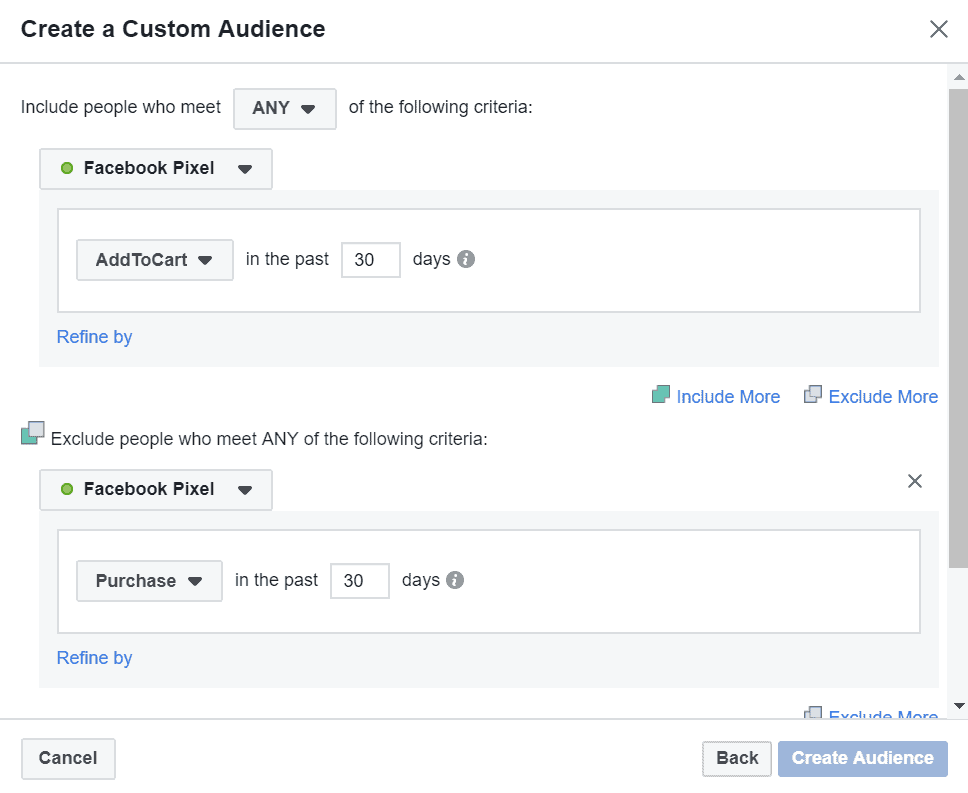
The example above shows a custom audience that includes everyone that has triggered the Add To Cart event but not the Purchase event.
This is a custom audience I use all the time.
Retargeting people that have added a something to their cart on your website but not yet bought it, is incredibly effective.
Mix & Match
With the Include More and Exclude More buttons that you can see in the last screenshot, there is an almost limitless number of combinations you can make.
You can combine People who visited specific web pages with Visitors by time spent or any of the Event based options.
I recommend trying not to make it too complicated.
You can also include and exclude different custom audiences at the Ad Set level of your retargeting campaign. More on that in a second.
Custom Audience Time-Frames
For every website visitor custom audience, you need to select the number of days into the past, you want people to be included in your audience.
30 days for example, means that people will be included in your custom audience for 30 days after they met the criteria you set.
What you select here depends on how much website traffic you’re generating and your specific Facebook advertising strategy.
The longer the time window, the larger your custom audience will be, but the less engaged it will be.
Very short time windows on the other hand, such as 7 days, are going to contain very warm prospects.
It’s impossible for me to tell you exactly what to choose, but Facebook’s default of 30 days is often a good starting point.
Once you’ve entered your custom audience criteria, simply give it a name and select Create Audience.
And that’s it, your website visitor custom audience has now been created.
How to Retarget Website Custom Audiences on Facebook
Now that you’ve created your custom audience, you need to add it to your retargeting campaign.
You do that by navigating to the Ad Set level of you retargeting campaign. And entering the name of you custom audience here:

In the screenshot above you’ll see that there is a small Exclude button beneath the Custom Audience text field.
I often find it easier to create simple custom audiences and do most of the narrowing here.
For example, instead of creating a custom audience that includes Add to Carts and excludes Purchases.
I will create an Add to Cart custom audience and a Purchases custom audience and exclude the Purchases custom audience here:
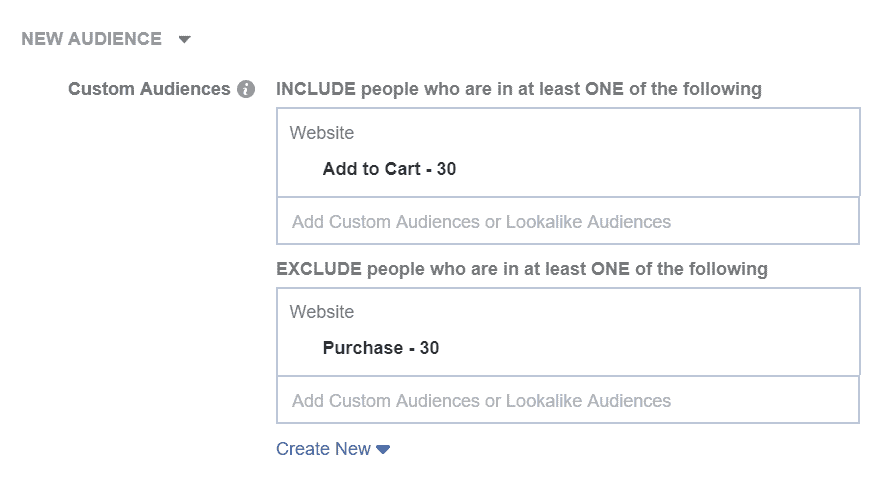
Of course the way you do this is completely up to you.
Using Retargeting in a Sales Funnel
Facebook advertising sales funnels that use multiple ad campaigns to take prospects through a series of “warming up” steps, nearly always outperform single ad campaigns.
Retargeting website visitors on Facebook is an essential component of any sales funnel. It’s how you identify the stage people are at and more them onto to the next stage.
I have created a free training called: 3 Killer Facebook Ads Strategies To Double (Or More!) Your Revenue! that shows you exactly how to select the right strategy for your business and create profitable Facebook ad sales funnels.
Conclusion
Being able to retarget website visitors on Facebook is an incredible digital marketing opportunity.
If you’re serious about advertising on Facebook, you should include a website visitor retargeting campaign in your overall strategy.
To retarget website visitors, you need to have the Facebook Pixel installed.
This can be a bit technical, but it is well worth doing.
There are 4 main options for creating website custom audiences:
- All website visitors
- People who visited specific web pages
- Visitors by time spent
- Event based
Which type of website visitor custom audience are you going to create first? Let me know in the comments section below.


Sorry, the comment form is closed at this time.